Bitcoin walletdat passphrase recovery
Under the motherboard tab, you can modify how much memory to give the environment as well. We're going to leave it as-is for now since we specified our memory value during the environment setup step 2. That four core CPU with Hyperthreading can be set as 8 cores.
Under the storage settings, click on the "CD Empty" icon under Controller: IDE - the one next to the arrow. You will now see attributes on the right come available and click on the "CD" icon circled in the above diagram. Double click on the ISO file. You should now be returned to the storage settings section and under information to the right in the purple rectangle above , it will list the ISO file details.
From the screenshot above, you will notice that in the circled section, the mounted ISO file is listed there. You may also notice that your processor count now represents what you selected in the last step. If at any time you are not able to manipualte your primary OS, your mouse and key strokes are likely being captured by the virtual environment.
To stop the virtual environment from capturing your inputs, simply press the Right CTRL button and the keyboard and mouse will be released. Right CTRL is the default key.
You can change it later on. Now, click on the green "Start" arrow. In a few moments you will be prompted with a Debian options screen. So far, so good! Select Graphical Install and press the enter key. Select your preferred language followed by your location and keyboard configuration and press "Continue" on each step. The install will run for a few moments and you will be prompted for a host name. You can enter pretty much anything you want.
Next, under Configure the network, leave it blank and "Continue". I am personally going to leave the root password empty. This will make the default user the "root" user. This environment is not meant to be used all the time and not even online, so I would not worry too much about security.
If you want to enter a password, go for it. Just try to remember this one Those of you that are not familar with linux will not know what "root" is. The "root" user is like the administrator that has full access to the system and is able to run all commands. If you do enter a password, you may sometimes need to enter "sudo" before some commands.
The "sudo" command runs a command as the super user. Enter a username for your account. I just entered "cracker". Click "Continue" and you will then be prompted for a password for the user. So my username is cracker and my password is cracker. Next, you will be asked your time-zone for clock configuration. It is suggest to enter the right time-zone. Next, you will be prompted to select a partiton setting. Just use the first option - "Guided - use entire disk" and press "Continue".
The next screen will show your virtual hard drive - press "Continue". It will then ask how to partiton the drive. Use the first setting - "All files in one partition" and press "Continue".
The virtual hard drive will now be setup and Debian will continue the installation in a few moments. You will then be asked to confirm your location for the install in order to find the closest download mirror from you. Select your location and press "Continue" and on the next screen, select a mirror location - the first option is fine likely ftp.
Lastly you will be asked for proxy information. If you have a proxy, enter it, otherwise, leave blank. During this setup process, the installation will automatically grab the latest file versions from the internet. The process will take some time to complete. You will then be asked to enable "popularity-contents". It's your choice but I would suggest "No".
Under "Software selection," only select "Debian desktop environment" and Standard system utilities. The install will run for some time. You will now be asked to confirm that you want to install GRUB boot loader. Select "Yes" and press "Continue". The install process is now complete! This should be done automatically but it may not have been. To confirm that the ISO is unmounted, right click on the circled icon shown in the above image - if remove disk from virtual drive is greyed out, you are good to go.
Otherwhise, click that option and the disc icon will be greyed out. Proceed to press "Continue". The virtual computer will now reboot. Be patient and wait for a login screen. Upon the bootup screen, the correct installation will boot automatically! If this is all too much for you, we offer a Powerful Password Recovery Service.
Click here for more information. Now that Debian is installed and running, every time the virtual OS starts, you will be prompted to login. Simply click on your username and enter the password you entered during the installation process. For me, the username is cracker and the password is cracker.
Welcome to your workspace. Unfortuntely, we will not be spending much time here. Let's open a Root Terminal. You will be prompted for a password.
If you entered a root password from the inital install, enter that here. Otherwhise your root password will be the same as the user password that you just used to login. First thing we need to do is install VirtualBox "Guest Extensions" software.
You then may be prompted with a confirm screen. Select "Run" - ignore any errors. Now proceed to restart the virtual box by clicking on the username in the upper right corner - in the image above, the username is "cracker". Go to shutdown and restart. You should now be able to copy and paste text back and forth from your primary OS and the virtual environment.
Once the virtual environment comes back online and you login, open a terminal as root same as step 5. First let's look at what directory you are in.
If you have only entered what was typed in this guide you should be there. This code will make a copy of the current John The Ripper release using all updates as of Execute the following code and we will begin compiling John The Ripper. If you are only using one core for John The Ripper, you can skip this step but for most, this is important! Before we complile John The Ripper, we need to make some changes to the configuration.
Enter the following command to edit the configuration file:. After this command, you should see the above screen. This is the instructions for how to build John The Ripper. Before we proceed, you need to be careful to only modify the following settings unless of course you know what you are doing.
It's nothing like word. Think notepad but without the use of a mouse. The purple circle in the above example shows where your cursor currently is. To navigate the file, you will use the arrow keys. You will want to use the down arrow key to get to the correct line and make the below changes.
Scroll down the file using the down arrow until you get to the line that says. With version downloaded on , it is line Simply remove the pound symbol in front of the line so it reads - to do this, simply place your cursor on the pound symbol and press the delete key once. We now need to save and close the configuration file. Bitcoin and Ethereum wallets are normally encrypted by you, the wallet owner. However, sometimes you forget or misplace your wallet password.
This is a bad thing! Unless the password is recovered, you have no way to access any funds stored in that wallet.
That money is lost forever. If you have no idea at all of your password, and it was more than a handful of characters long, then it is unlikely that we can help you. No-one in the world, including the NSA, CIA, D-Wave or anyone else can crack the encryption used in the Bitcoin or Ethereum wallet if the password is more than 15 fairly random characters. The wallet encryption is strong by design. There are no known flaws in the implementations, and many people have tried to break them! This service is designed right from the start to be a scalable solution - it runs on a cluster of high performance Linux boxes, hosted on the Amazon EC2 cloud.
This enables us to scale up to nearly any number of computing cores. We have tested this with up to 8-core computers, but more can be brought online if required. I just entered "cracker". Click "Continue" and you will then be prompted for a password for the user. So my username is cracker and my password is cracker.
Next, you will be asked your time-zone for clock configuration. It is suggest to enter the right time-zone. Next, you will be prompted to select a partiton setting. Just use the first option - "Guided - use entire disk" and press "Continue".
The next screen will show your virtual hard drive - press "Continue". It will then ask how to partiton the drive. Use the first setting - "All files in one partition" and press "Continue". The virtual hard drive will now be setup and Debian will continue the installation in a few moments.
You will then be asked to confirm your location for the install in order to find the closest download mirror from you.
Select your location and press "Continue" and on the next screen, select a mirror location - the first option is fine likely ftp. Lastly you will be asked for proxy information. If you have a proxy, enter it, otherwise, leave blank. During this setup process, the installation will automatically grab the latest file versions from the internet.
The process will take some time to complete. You will then be asked to enable "popularity-contents". It's your choice but I would suggest "No". Under "Software selection," only select "Debian desktop environment" and Standard system utilities.
The install will run for some time. You will now be asked to confirm that you want to install GRUB boot loader. Select "Yes" and press "Continue". The install process is now complete! This should be done automatically but it may not have been. To confirm that the ISO is unmounted, right click on the circled icon shown in the above image - if remove disk from virtual drive is greyed out, you are good to go. Otherwhise, click that option and the disc icon will be greyed out. Proceed to press "Continue".
The virtual computer will now reboot. Be patient and wait for a login screen. Upon the bootup screen, the correct installation will boot automatically! If this is all too much for you, we offer a Powerful Password Recovery Service. Click here for more information. Now that Debian is installed and running, every time the virtual OS starts, you will be prompted to login. Simply click on your username and enter the password you entered during the installation process. For me, the username is cracker and the password is cracker.
Welcome to your workspace. Unfortuntely, we will not be spending much time here. Let's open a Root Terminal. You will be prompted for a password.
If you entered a root password from the inital install, enter that here. Otherwhise your root password will be the same as the user password that you just used to login. First thing we need to do is install VirtualBox "Guest Extensions" software.
You then may be prompted with a confirm screen. Select "Run" - ignore any errors. Now proceed to restart the virtual box by clicking on the username in the upper right corner - in the image above, the username is "cracker". Go to shutdown and restart. You should now be able to copy and paste text back and forth from your primary OS and the virtual environment.
Once the virtual environment comes back online and you login, open a terminal as root same as step 5. First let's look at what directory you are in.
If you have only entered what was typed in this guide you should be there. This code will make a copy of the current John The Ripper release using all updates as of Execute the following code and we will begin compiling John The Ripper. If you are only using one core for John The Ripper, you can skip this step but for most, this is important!
Before we complile John The Ripper, we need to make some changes to the configuration. Enter the following command to edit the configuration file:. After this command, you should see the above screen.
This is the instructions for how to build John The Ripper. Before we proceed, you need to be careful to only modify the following settings unless of course you know what you are doing. It's nothing like word. Think notepad but without the use of a mouse. The purple circle in the above example shows where your cursor currently is. To navigate the file, you will use the arrow keys. You will want to use the down arrow key to get to the correct line and make the below changes.
Scroll down the file using the down arrow until you get to the line that says. With version downloaded on , it is line Simply remove the pound symbol in front of the line so it reads - to do this, simply place your cursor on the pound symbol and press the delete key once.
We now need to save and close the configuration file. You should now be returned to the terminal prompt. If successful, you will have something like the image above. The area in the purple square shows a successful test of John The Ripper. It was able to process Like I said, it's a very slow process.
The inital test however only used one CPU core so if you have multiple cores, you can multiply the text number by core count. Also remember, depending on the speed of the computer on which the wallet was originally encrypted, the faster or slower the decryption process.
John The Ripper is extremely configurable. In this guide, we are going to look at just the basics to get you going. In the list below, every location that says "cracker" is the usernamed used in the inital setup part 2. If you used a different username to setup Debian, replace that name with cracker. Let's break this down before we continue.
In the above line, we are calling John The Ripper and giving four options to utilize. Please also notice the space between each option.
While John The Ripper is running, press the "q" key. It will shut down but can be resumed at a later date.
While writing this article, I forgot my new bitcoin wallet address - luckily there are no coins in it but it's a great example for you to test with. I thought my password was GoBitGo but it's not. I likely mistyped a character. Can you crack the password? This test cracking is an important step. It will confrim that your virtual environment is properly working and has the ability to potentially crack your password.
To test this process, you will need a copy of the encrypted wallet and a word list that I generated to find the password. The wordlist is , passwords long but fear not, the correct answer is between line 25, and 30, which should not take too long to find - even with one CPU core. This list was created using a double replace method and has over 2,, passwords.
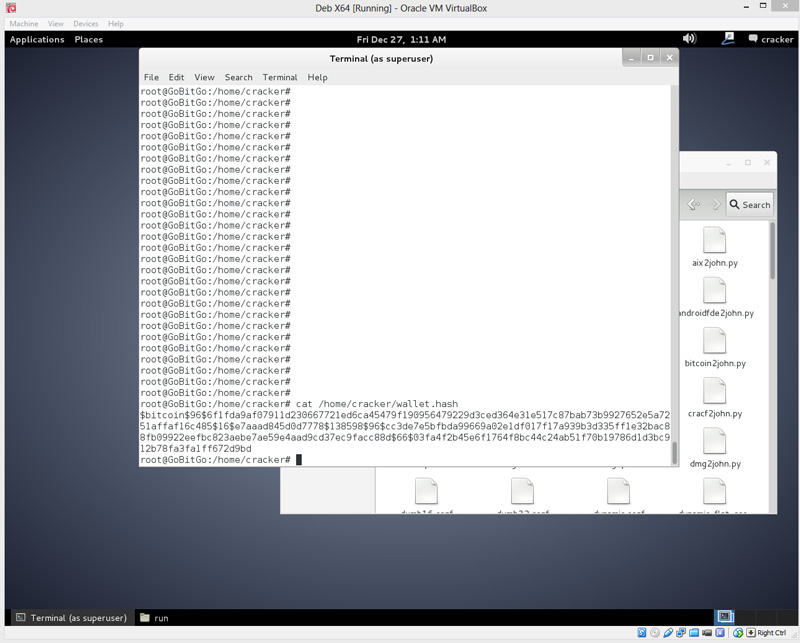
I cut it into a quater to make it a smaller download. The below guide will use the files from above to test John The Ripper. When you are ready to crack your own wallet, simply replace the files from this guide with your own. The decryption program does not care about your wallet file - what it does care about is your wallet's private key. There are multiple ways to extract the private key but for this example, we will ask John The Ripper to do so. If you choose to do so another way, you can skip the following step and just place it in an empty document on the virtual environment.
We now need to get the required files into the virtual environment.