Ashland Tech
4 stars based on
69 reviews
Most weeks, our famed MakerBot printouts are culled from a handy website called Thingiverse. It's here that members of the CNC community can submit pre-made models for anyone to print — and if some of our past videos are any indication, there are google sketchup makerbot very good ones available too.
But while it's easy to print someone else's creation, there's something to be said for designing one yourself. There's a sense of accomplishment that you just don't get by mashing "print" on a pre-made design. Today, we're going to use a free piece of software called Google SketchUp to make a simple 3D model, and show you how to turn your creation into a tangible piece of printed plastic art.
There are some caveats, of course — some objects and designs are simply impossible to print — but we'll make sure you come away with something awesome for your effort. After all, if you make something especially cool, we could print it on a future episode of the MakerBot Mystery Build!
Earlier this week we introduced you to a couple of 3D modelling applications, many of them free. However, this particular guide will focus on Google SketchUp. It's the easiest to acquire and learn, and is available for both Mac and PC. You're free to use competing and more complex suites, of course — such as Blender, Maya or even 3DS Max — but the process will most likely differ.
The simplest design to start with is a logo google sketchup makerbot symbol, with parts that can be extruded — or in other words, raised to create an object with three-dimensional depth. Once you've settled on an idea or design, you have two options.
Simpler designs can simply be imported as a raster image into SketchUp, where you can then trace over lines and shapes to create a digital copy. However, this can take a great deal of time, especially with SketchUp's limited drawing tools, and is entirely impractical for more complex designs.
Thus, your second option is to create a vector google sketchup makerbot using either Adobe Illustrator or the freeware Inkscape, and import your design into SketchUp in a format the software can understand. Luckily, both Illustrator and Inkscape have built-in tools to convert raster images or bitmaps into vector images for us to work with. In fact, we've even covered the process before. However, you can also trace your own paths over the image manually for more refined or precise results for those of you new to the pen tool, read this.
This is an image with simple shapes, and a google sketchup makerbot small number of curves, which should make it ideal for 3D printing. As you can see in the above example, we've modified the image so that only the shapes or faces we want to extrude are visible. Simply accept all prompts and default settings, if any. DWGs — aren't included. But there is a workaround. By downloading the google sketchup makerbot version of Google SketchUp, Version 7. Upon opening SketchUp for the first time, feel free to google sketchup makerbot yourself with some of the tips and tutorial videos until you're comfortable with the software.
You don't need to learn much for the purpose of this article, but the basics are useful if you've never used a 3D modelling suite in the past. SketchUp will also ask you to select a template before continuing. For our purposes, " Product Design and Woodworking millimeters " is ideal.
After importing your finished vector into SketchUp, we'll need to make a few tweaks. Google sketchup makerbot example, the conversion process has stripped our design of its faces, leaving a wireframe outline that is unfit for printing. We need to get those faces back. Luckily, the restoration process is simple. First, draw a rectangle that surrounds your entire object, preferably centered. This will ensure the paths of google sketchup makerbot vector image are cleaned up and ready for extrusion.
If the option is greyed out, don't worry — your vector is already fine. By merging our outline with the rectangle we've just created, we've easily restored our design's missing faces. Finally, we're going to extrude our 2D vector image into a 3D model ready for printing. This may be difficult to do for the default perspective, so feel free to change camera angles as required from the Camera menu.
Finally, if you chose to retain a backing plate, google sketchup makerbot free to extrude google sketchup makerbot by a small amount, relative to your raised faces. This extra depth is necessary to give the MakerBot a base on which to print.
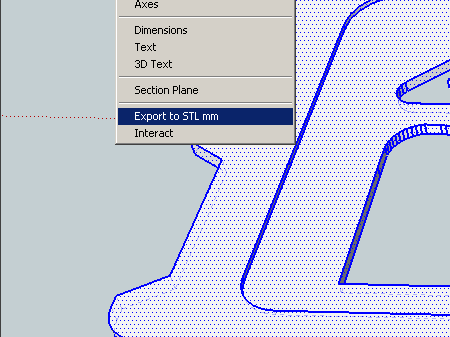
By this point, we should now have a working 3D model with which to print. But we're not quite done google sketchup makerbot. This format isn't natively supported google sketchup makerbot Google's app, however, so you'll need to install one additional plugin, found here. STL from the drop-down. You should be left with an. This application will take your 3D model, and convert it into something called G-Code google sketchup makerbot, which is essentially a series of coordinates necessary for the printing to take place.
It is here that your model is separated into so-called slices, to be printed one layer at a time. You'll have google sketchup makerbot chance to see one final google sketchup makerbot rendering of your model before printing begins. This is important, as there's a good chance your model might not be scaled or positioned properly for printing.
Feel free to adjust your object's placement as required. At this print, you can finally hit print, cross your fingers, and wait. You can even google sketchup makerbot your finished creation to Thingiverse for others to use, even if you don't have a MakerBot or CNC machine of your own. Snub-Nosed Blade Runner Blasters!
Adam Savage Makes an Octopus Puzzle! Adam Savage's One Day Builds: Making a Skyrim-Inspired Foam Sword! Custom Stay Puft Marshmallow Man! Adam Google sketchup makerbot Repairs Totoro Costume! Cutaway Millennium Falcon Model Miniature! Making a Working Ghostbusters Ghost Trap! This is how our image looks when imported into SketchUp — outlines only.