


6 reasons litecoin is still massively undervalued bix weir
39 comments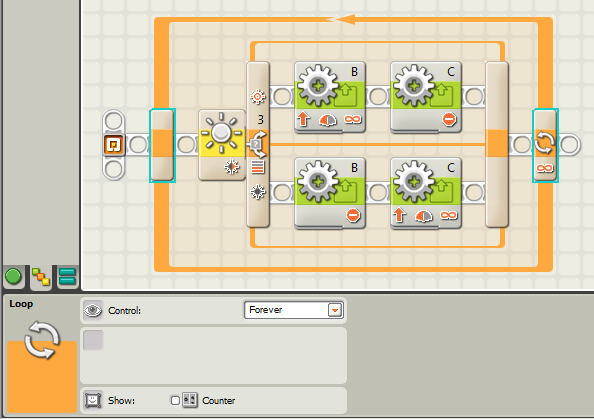
Litecoin projections 2025
The getLightPercent and getLightPortion functions below may need to be created by you. The code below is more of a pseudocode than any actual code you can copy-and-paste into your program. Line Following Methods Example Programs Most line following programs utilize some formula for determining if the robot should move to the left, or right, in order to stay on the line.
Whether the line is straight, curved, or a combination of both, the robot will use a simple formula to determine its position in relation to the line and how it should move in order to stay on the line. There are dozens probably hundreds of different programs that can be written to help the robot follow a line. Several of the various programs are discussed and illustrated below.
If the robot has only one light sensor, the line following program will instruct the robot to follow only one side of the line left or right depending on the formulas used in the program and the orientation of the motors in the robot design. This exercise walks you through the different steps in setting up a line following task and running it from within the main task.
The purpose of using a separate task for line following is so you can break from the line following based on the use of existing until functions such as untilSonar , untilTouch , untilDistance , wait , etc.
Once the condition has been met in the until function, then stop the line following task to stop following the line. The are practical advantages and disadvantages to each. Some programs may work better with un-calibrated sensors--especially those that pass values directly to the steering option of the Move block. Programs with "Calibrated" light sensors may work in different environments and under different conditions without modification--all that needs to be done is to re-calibrate the sensors.
Values less than 0 will steer the robot in one direction. Values greater than 0 will steer the robot in the other direction. If the value is equal to 0 then the robot will drive straight. The basic idea in using this block for line following is that you want to get the robot to steer in one direction if the light sensor sees the black line and to steer in the other direction if the light sensor sees the white surface background. There are two basic ways of creating the formula.
Light Sensor Value minus a constant k equals the new steering amount Constant k minus the Light Sensor Value equals the new steering amount Which formula you decide to use will depend on whether you want the robot to follow the left side or the right side of the line.
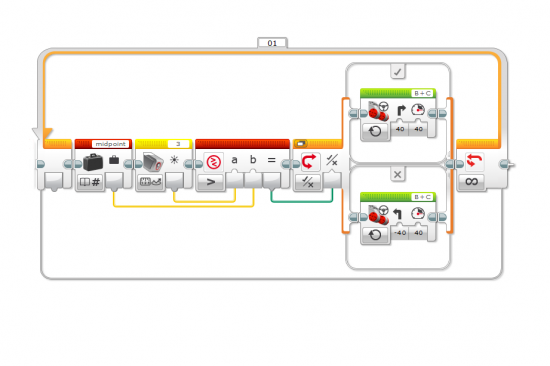
The other part of the formula you need to determine is the value for the constant k. In general, the value of the constant k should be set to the midpoint of the light range. The "light range" is the difference between the lowest and highest values obtained from the light sensor. The duration of the Motor block should be sent to infinity.
And the combination of light sensor, Subtraction with k, and Motor block should be placed within an infinite loop. The power level for the Motor block should be set to a low value at first and then gradually increase this to see how well the robot is able to follow the line. Which formula you decide to use will depend on whether you want the robot to follow the left side or the right side of the line.
Pseudocode for the smallest form of this program using Un-Calibrated light sensors: The smallest form of this program works best if using Un-Calibrated light sensors.
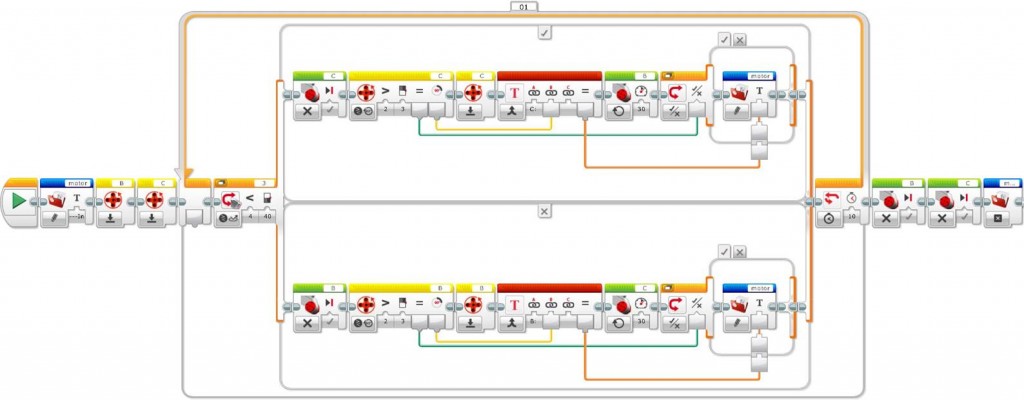
Pseudocode for the larger form of this program using Calibrated light sensors: If you calibrate the light sensors using the Calibrate block, then the highest value white background would be and the lowest value black line would be 0. Light Sensor value divided by times 80 minus The direction of the comparison option determines if the robot follows the left or right side of the line. Divide the light sensor value by which converts the difference to a portion that ranges from 0 to 1.
Now multiply that portion times the maximum power level to get the power for the first motor. Subtract the power for the first motor from the maximum power level to get the power for the second motor. Try to keep the robot moving forward by adding a constant power to both motors. Now multiply that portion times the maximum power level and add a constant to get the power for the first motor.
Multiply that portion times the maximum power level and subtract that product from the maximum power level to get the power for the second motor. Adjust the performance of the robot by increasing or decreasing the variable amount of power used to calculate the product: Now take the current level of light and subtract it from the target level.
The difference will be negative or positive depending on whether the current level is higher or lower than the target. Multiply that ratio by the amount of variable power.
Then add this product to one motor and subtract the product from the other motor. Calculate the difference between the light sensors and add to the Difference. Then divide that sum by which converts the difference to a portion that ranges from 0 to 1. Multiple that difference by 0.
Use this product as the value for Steering in a Move block. Measure the color of light reflected from the surface. If White, then you are off of the line Oops.
Force a turn to get back on the line. If Green, turn one way and set a value for turning if you eventually see White. If Blue, turn the other way and set a value for turning if you eventually see White. If Black, just go straight. If touch sensor is not touched, steer toward the wall. If the touch sensor is pressed, then steer away from the wall.