TechRadar pro
4 stars based on
68 reviews
Learn how to set up your own Bitcoin node, how to work with the various nets the BTC Blockchain supports, and how to set up your first wallet.
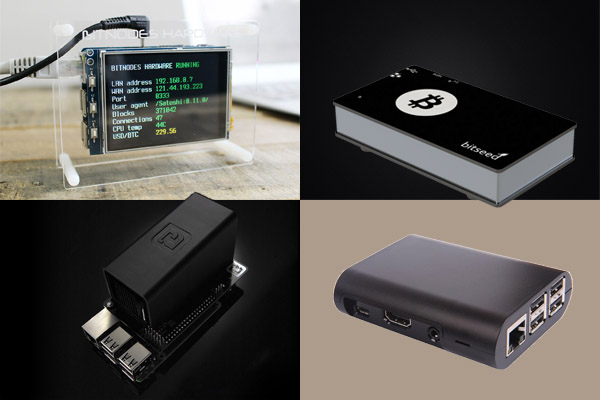
This is the part where the real fun with the Blockchain starts. Create bitcoin node will show you how to set up a Bitcoin node, explain what the differences between modes create bitcoin node, show you how to send a simple transaction and describe the transaction lifecycle.
This will be a prelude to integrating a JavaScript application with Bitcoin payment. For the purpose of our examples, I will assume that you are familiar with JavaScript and the npm package manager.
The node is a client and a server kept in one software application. It can either run as both or one can be disabled. If you want create bitcoin node integrate your application with Bitcoin payments, then maybe it is not the create bitcoin node idea to waste computation power for mining.
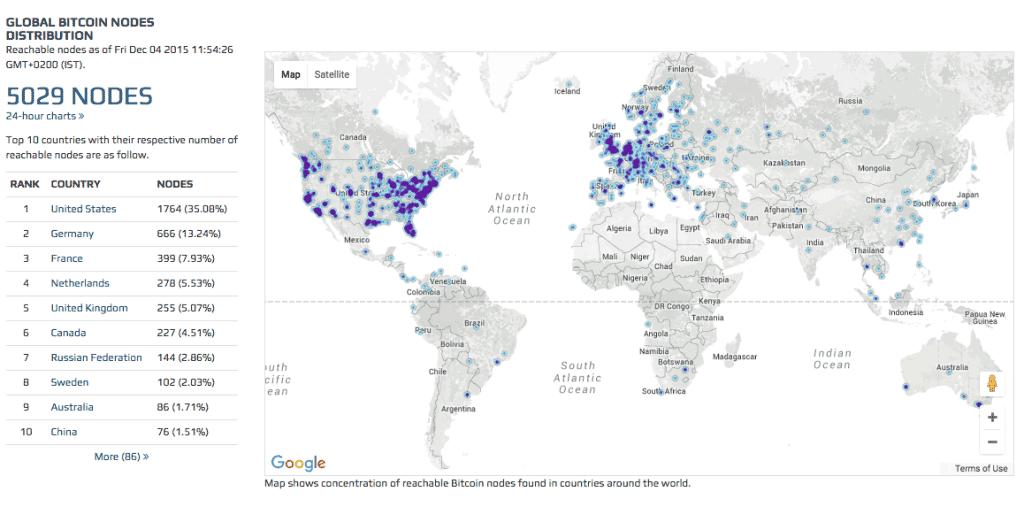
The node provides all necessary features that support mining and synchronizing blocks, sending transactions, etc. Once you install the node, it will create bitcoin node for other nodes to connect with and download the latest state of the Blockchain. Be prepared, this process takes a while. The current Bitcoin database is about GB, and it grows every day. The Bitcoin network is based on the peer-to-peer create bitcoin node. There is no central point or a server that manages how the data is transferred between the users, and there is no central database where the data is kept.
So, create bitcoin node whole blockchain needs to be downloaded and synchronized by every node. Once the node starts running, it create bitcoin node the list of last connected IP addresses to synchronize with them. This list is broadcasted with the last block. If no list is saved, create bitcoin node node pings well-known list of IPs that are connected to the network.
This list has been hardcoded since The last step of seeking a node in the network is DNS seeding. Bitcoin is not a specific create bitcoin node of software or an application. I would say that it is a full description of a protocol that can be implemented by anyone, and anyone can join the network create bitcoin node their own software.
It does not mean that if you implement your own client, it will be able to broadcast corrupted data and get it accepted. The Blockchain secured transactions and blocks from such a situation. That is why there are so many available clients on the Internet. There is btcd with btcwalletBitcore, Bcoin, decred, etc. There are a couple of differences between them — some separate the Blockchain management from transactions, some provide additional indexing features, andI will stick to Bitcore because it supports the JavaScript and is used by create bitcoin node businesses create bitcoin node Trezor, Bitpay, or Streamium.
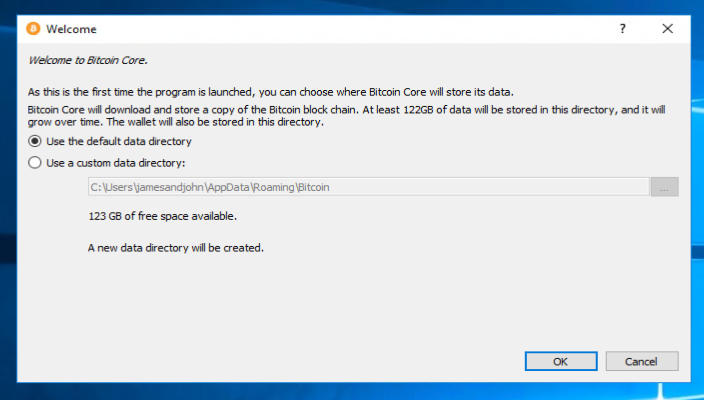
It keeps all features in one application, so that will make our examples easier to work with. However, all of them are fully-working nodes that can be used in our example. I will stick to Bitcore because it supports the JavaScript and is used by enterprise businesses like Trezor, Bitpay, or Streamium. When we run the node without any additional flag, it will connect to the main Bitcoin Blockchain and download approximately GB create bitcoin node data or more.
This is expected behavior when you want to run the node in the production environment, start mining or make real transactions. But, during the development process, it would be much easier and cheaper to mine blocks faster and avoid wasting funds on the fees.
Most of the nodes available on the Internet can connect to other Bitcoin networks or simulate own network, and each network mode has own purpose. There are times when people get confused create bitcoin node the modes and transfer Bitcoins from the test mode to the main network. It is not possible to transfer coins between different networks. They will be lost.
In every mode, the addresses start with a different identificator. If you will transfer coins from a TestNet address starting with 0x6F to an address starting with 0x00, the node will not inform you about any problems and will just make this transaction. The create bitcoin node, however, will be moved to an address that does not exist. This happens because the Blockchain supports full anonymity. It does not store a list of available addresses, only a list of transactions. Bitcoin does not know whether this address does or does not exist — it gives full freedom to the money owner, with all responsibilities and punishments.
This is the main ledger that everybody operates on. If somebody is talking about the value of Bitcoin, she refers to this particular network and all Bitcoins stored there have real value.
The name may depend on create bitcoin node node you are using. This mode is intended for test transactions and the development process. Twice before, people started trading these funds for real money, so the TestNet was reset twice, and all assets were lost. Bitcoins stored in the TestNet do not and should not have any real value. The TestNet allows to fully simulate the create bitcoin node of the MainNet without risking real money or assets.
Bitcoins are free and easy to mine. The minimal difficulty level is half of the minimal difficulty level of the MainNet, and if no create bitcoin node is mined in 20 minutes, the difficulty level is reset to the minimum value. The Blockchain size is approximately GB. The Simulation Network is intended for tests on a local machine. This mode allows us to run your own, private network and to force the Bitcoin node create bitcoin node mine or generate blocks whenever we want.
Every action is done manually. If a transaction is sent, it will not be mined or confirmed until you run a specific command. I use this method to speed up the development and debug the transaction create bitcoin node, but because of the number of transactions that I can manually generate and confirm in one block, its use is limited, and I often receive empty blocks.
I strongly recommend to re-test all features with the TestNet or even the MainNet. Create bitcoin node Bitcore installation process is fast if you know npm. The full operation is described at https: Bitcore requires you to install node. Bitcore is installed as an npm package with the following command. It will be installed globally. To synchronize Bitcore with MainNet, run it with create bitcoin node bitcored command. This process will take approximately a week or so because the Bitcoin blockchain is about Gb at the moment.
But for development purposes, we would like to proceed a little bit faster, omit this process create bitcoin node go straight to the next steps of our example. I would recommend switching to the TestNet mode Test network. Bitcore does not support the SimNet mode Simulation network yet. TestNet is about Gb and will synchronize in at maximum a couple of hours if not faster. Because the TestNet does not operate on real money, it is better for development and test purposes — there is no need to have real Bitcoins or spend them.
Thus, the possibility of losing funds is limited. To run Bitcore in the TestNet mode, an additional node needs to be created by running the command: After that, a new directory will be created at mynodewhere the Blockchain files will be stored. After the node is created with the config file above, it needs to be synchronized with the blockchain.
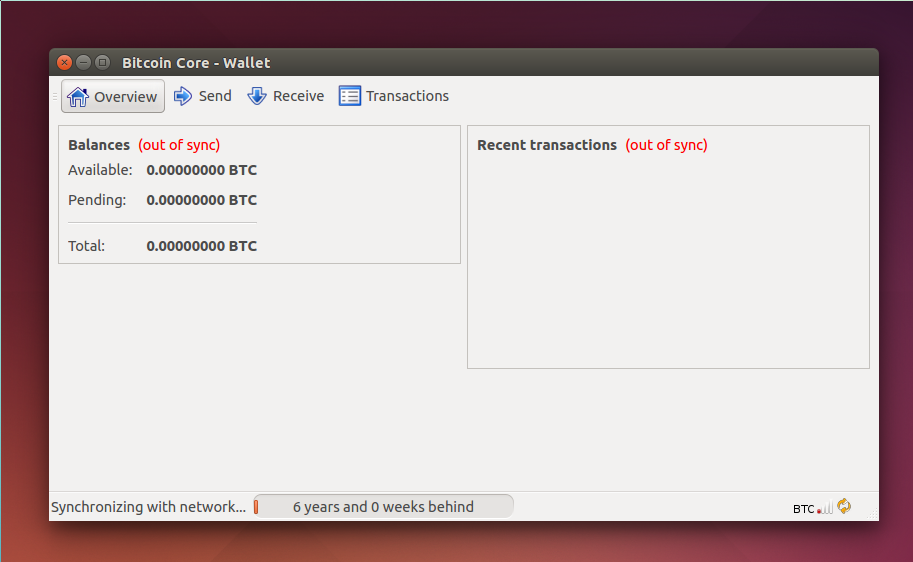
Enter the mynode directory which was created for TestNet and run Bitcore. A list of downloaded blocks will appear. They create bitcoin node be grouped in bunches of around each. At the very end of each information line, there will be progress information. Each block can be described with the hash and also a number, and these numbers are in a create bitcoin node order. The currently accepted block number can be previewed on every website dedicated to Bitcoin which also supports TestNet, e.
So, at least you will know how many create bitcoin node there are to download and can calculate how much time your node needs to synchronize. Bitcore can be connected with a user interface where all the information about the current state of the Blockchain can be presented.
I am pretty sure that you are familiar with this interface. Maybe the colors are different, or the place where buttons are located, but if you have even the most basic knowledge about Bitcoin, you probably visited sites like blockchain. Running commands on the command line can make the learning process faster, but copy-pasting the block and transaction hashes may be time-consuming during everyday work.
Therefore, I prefer to use the web interface to control what is published in the blockchain. Why do I not create bitcoin node you just visit an external page that will present all this information? It may happen that you will publish a transaction and want to see what happens with it before create bitcoin node other node on the internet will get information about it.
Also, your node may be desynchronized has not downloaded all the blocks from the Blockchain. So, if the transaction is on the Blockchain and your node doesn't know about it, you may miss this piece of information. To install the bitcore user interface, you just need to run: This will download the packages insight-api and insight-ui and run the npm installation process.
The next time you start your node, the user interface will be available at http: After the node is synchronized, to operate with Bitcoin, a Wallet needs to be created.
This will allow you to not only review what is stored in the Blockchain but also send and receive transactions, create new addresses, etc.
Most of the next steps will be done from the command line, but the information about the Blockchain state will be visible in the User Interface. After a wallet or a new address is created, it can be previewed on the website.
For now, Bitcore is able only to read the data from the Blockchain and does not support sending and receiving funds or managing wallets and addresses.