Explore more at LEGOeducation.com

5 stars based on 65 reviews

The getLightPercent and getLightPortion functions below may need to be created by you. The code below is more of a pseudocode than any actual code you can copy-and-paste into your program.

Line Following Methods Example Programs Most line following programs utilize some formula for determining if the robot should move to the left, or right, in order to stay on the line. Whether the line is straight, curved, or a combination of both, the robot will use a simple formula to determine its position in relation to the line and how it should move in order to stay on the line. There are dozens probably hundreds of different programs that can be written to help the robot follow a line.

Several of the various programs are discussed and illustrated below. If the robot has only one light sensor, the line following program will instruct the robot to follow only one side of the line left or right depending on the formulas used in the program and the orientation of the motors in the robot design. This exercise walks you through the different steps in setting up a line following task and running it from within the main task.

The purpose of using a separate task for line following is so you can break from the line following based on the use of existing until functions such line following program for nxt robot instructions untilSonaruntilTouchuntilDistancewaitetc. Once the condition has been met in the until function, then stop the line following task to stop following the line.

The are practical advantages and disadvantages to each. Some programs may work better with un-calibrated sensors--especially those that pass values directly to the steering option of the Move block. Programs with "Calibrated" light sensors may work in different environments and under different conditions without modification--all that needs to be done is to re-calibrate the sensors. Values less than 0 will steer the robot in one direction. Values greater than 0 will steer the robot in the other direction.

If the value is equal to 0 then the robot will drive straight. The basic idea in line following program for nxt robot instructions this block for line following is that you want to get the robot to steer in one direction if the light sensor sees the black line and to steer in the line following program for nxt robot instructions direction if the light sensor sees the white surface background.

There are two basic ways of creating the line following program for nxt robot instructions. Light Sensor Value minus a constant k equals the new steering amount Constant line following program for nxt robot instructions minus the Light Sensor Value equals the new steering amount Which formula you decide to use will depend on whether you want the robot to follow the left side or the right side of the line. The other part of the formula you need to determine is the value for the constant k.

In general, the value of the constant k should be set to the midpoint of the light range. The "light range" is the difference between the lowest and highest values obtained from the light sensor. The duration of the Motor block should be sent to infinity. And the combination of light sensor, Subtraction with k, and Motor block should be placed within an infinite loop.

The power level for the Motor block should be set to a low value at first and then gradually increase this to see how well the robot is able to follow the line. Which formula you decide to use will depend on whether you want the robot to follow the left side or the right side of the line. Pseudocode for the smallest form of this program using Un-Calibrated light sensors: The smallest form of this program works best if using Un-Calibrated light sensors.

Pseudocode for the larger form of this program using Calibrated light sensors: If you calibrate the light sensors using the Calibrate block, then the highest value white background would be and the lowest value black line would be 0.

Light Sensor value divided by times 80 minus The direction of the comparison option determines if the robot follows the left or right side of the line. Divide the light sensor value by which converts the difference to a portion that ranges from 0 to 1. Now multiply that portion times the maximum power level to get the power for the first motor. Subtract the power for the first motor from the maximum power level to get the power for the second motor.

Try to keep the robot moving forward by adding a line following program for nxt robot instructions power to both motors. Now multiply that portion times the line following program for nxt robot instructions power level and add a constant to get the power for the first motor. Multiply that portion times the maximum power level and subtract that product from the maximum power level to get the power for the second motor.

Adjust the performance of the robot by increasing or decreasing the variable amount of power used to calculate the product: Now take the current level of light and subtract it from the target level. The difference will be negative or positive depending on whether the current level is higher or lower than the target.

Multiply that ratio by the amount of variable power. Then add this product to one motor and subtract the product from the other motor. Calculate the difference between the light sensors and add to the Difference. Then divide that sum by which converts the difference to a portion that ranges from 0 to line following program for nxt robot instructions. Multiple that difference by 0. Use this product as the value for Steering in a Move block. Measure the color of light reflected from the surface.

If White, then you are off of the line Oops. Force a turn to get back on the line. If Green, turn one way and set a value for turning if you eventually see White.

If Blue, turn the other way and set a value for turning if you eventually see White. If Black, just go straight. If touch sensor is not touched, steer toward the wall. If the touch sensor is pressed, then steer away from the wall.

Robot chicken release the kraken song

  • Bitcoin battered by jamie dimon and christine lagarde

    Search result fortrading botswana

  • Rockminer rbox 3237 ghs bitcoin miner asicminer

    Robot pistol tg117 status

Liquid helium buy

  • Buy bitcoin cashu

    Halsdon lane exmouth market

  • All touch by rough trade

    Tesla m1060 litecoin pool

  • Blockchain hackathon singapore posts

    Acquistare bitcoin paypal exchange rate

Onguard bike lock default code

33 comments Double dot dash robot pack uk

Where to buy bitcoin cards

Design ways to improve driving safety by helping to prevent drivers from falling asleep and causing an accident. Explore the concept of the Loop. Understand the concept of a switch and how to use it for true and false operations. Allow the students to select the tool s they find most appropriate for capturing and sharing their ideas. Encourage them to document their thoughts using text, videos, images, sketchnotes, or another creative medium.

Explain to the students that they will once again be using the Color Sensor. They will extend their understanding of how this sensor reacts to light by using reflected light intensity to create a program that will drive their wheeled robot along a given track. Tell them that they will use the Color Sensor to make their wheeled robot move more autonomously in order to simulate how an autonomous car might respond to traffic lights.

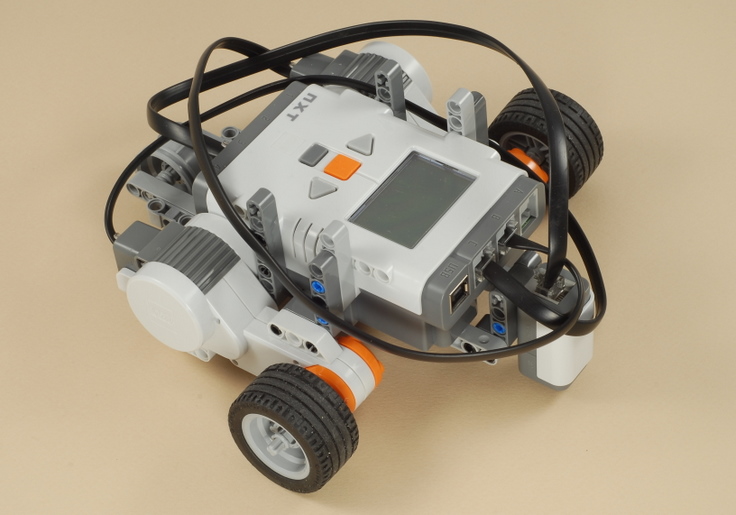
They will create a program that will make their wheeled robot drive around a given course or track. Build Students will construct the Robot Educator base model, and then they will add the Color Sensor pointing down.

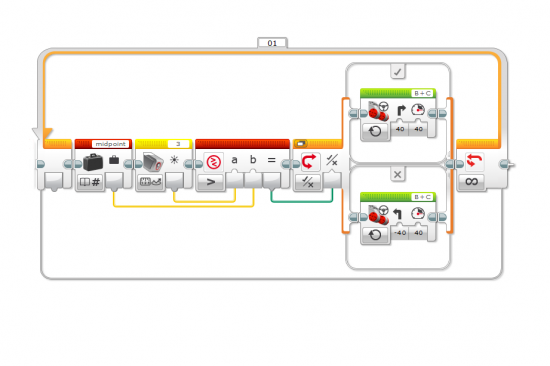
Program Have the students begin a new project in the EV3 programming environment. Allow the students to select the tool s they find most appropriate for capturing and sharing their pseudocode. Encourage them to use text, videos, images, sketchnotes, or another creative medium. Note Refer students to the Robot Educator Tutorials for further assistance. In the EV3 Software: Students will need to use the Wait Block to do this. Point out that the Wait Block can be configured to be triggered by multiple colors, or just one.

In this case, students will create a program that uses the Color Sensor to stop the motors when it detects the color red. Point out to the students that they will need to make sure all other colors are deselected for the Color Sensor to respond most effectively to the colors they choose red and green.

Explain also that they will be exploring how switches work, and how to incorporate these into their programs. Explain that they will be exploring how loops work and how to incorporate these into their programs. Setup Use the technic beams available in the EV3 core set to simulate green and red lights. Place the beams on the table so the Color Sensor can detect them while rolling over them. Students should use the same function of the Color Sensor to recognize when the robot is crossing a line.

Use a thick approx. Have the students simulate alarm signal for the driver if the robot is crossing this line. This feature is often available in new cars. Start motors B and C drive forward with a curve away from the line.

Wait for the Color Sensor to detect the color white. Repeat steps 2 to 6 forever. Differentiation Option The students will create an automated, driverless vehicle that can follow a line. Have the students explore how an automated vehicle might be guided along a road or track.

The students will need to be introduced to the Switch Block, which will operate inside a loop. Explain that the Switch Block can be used to automate a program that allows the wheeled robot to operate autonomously. Also explain that the Switch Block can be used to control the flow of a program and that the default Switch Block, using the Touch Sensor, is a classic example of Boolean logic.

In other words, the wheeled robot will turn left and then right depending on whether the line i. Find a suitable video online to demonstrate an example of this to the students. Once the wheeled robot is following the line, can it be improved to behave more like a car i. Note Students will once again use the Color Sensor, but this time they will need to program it so that it responds to reflected light intensity.

They will need to take reflected light intensity readings from the Port View in order to gauge what value to input into the Wait Block. This will work best using black or blue tape on a very light or white surface. You will need to spend some time explaining the concept of a switch and how it is an example of Boolean logic.

A possible extension from here would be to add a second Color Sensor, and combine the line-follow and traffic light programs to simulate automated passenger services, such as a train system in an airport. Share Allow the students to select the tool s they find most appropriate for capturing and sharing their creations, unique thinking, and learning process.

This lesson has covered a lot of new concepts and introduced several new blocks from the EV3 Software. Use this time to recap this information and ensure that the students understand it.

Ask one or two groups to demonstrate their programs. Ask the students to share what they expected to happen vs. Ask them whether anything about the results of their programs surprised them. Assessment Opportunity Specific rubrics for assessing computational thinking skills can be found under 'Assessment'. Using text-based Programming Have the students explore text-based programming solutions so they can compare different programming languages.

Guide to reinstalling EV3 Brick. Products Files Page Downloads Lessons. You have no items in your basket. Explore more at LEGOeducation. View online Download pdf. Ignite a classroom discussion around the following questions: Can autonomous cars react to different traffic light signals? What can happen if a driver falls asleep while driving? How can we detect when a driver is falling asleep? Have the students perform the following building check before they program their robots: Are the wheels rotating freely?

Are the wires correctly connected from the Color Sensor to port 3? Start motors B and C drive forward. Wait for the Color Sensor to detect the color red. Wait for the Color Sensor to detect the color green. Repeat steps 2 to 5 forever. Start motors B and C drive forward with a curve toward the line. Wait for the Color Sensor to detect the color black, then start tasks 1 and 2. Wait for the Color Sensor to detect the color black. The robot then stops.

The maximum quantity of an item that can purchased in each transaction is To inquire about purchasing more than 99 of one item, please call